What Is the EMA Indicator?
In Formula 1, a driver who reacts only to what happened three laps ago will crash. The track is live, temperature, rubber buildup, tire degradation, a rival’s pace, it changes every second. The fastest drivers process recent data with far more weight than old data. What happened on lap 1 barely matters by lap 40.
The Exponential Moving Average (EMA) applies that same logic to price. Unlike a simple moving average that treats every data point equally, lap 1 and lap 40 the same, the EMA gives dramatically more weight to recent price action. The result is a moving average that reacts faster to new information, hugs price more closely in trends, and signals directional shifts earlier than its simpler counterpart.
It is the most widely used moving average in professional trading for a reason: markets are forward-looking, and the EMA is built to keep up.
EMA vs. SMA, The Critical Difference
Before the formula, let’s establish why the EMA exists at all.
A Simple Moving Average (SMA) adds up the last N closing prices and divides by N. Every day gets equal weight. The close from 20 days ago counts exactly as much as today’s close. This creates a smooth line. But one that lags significantly, especially in fast-moving markets.
An Exponential Moving Average (EMA) solves that lag problem by applying a multiplier that decays exponentially, recent closes get heavy weighting, older closes get progressively lighter weighting until they effectively disappear.
Practical result:
- In a fast uptrend, the EMA stays closer to price than the SMA
- When price reverses, the EMA signals the turn sooner than the SMA
- The EMA is more sensitive to momentum shifts, which is exactly what active traders need
The tradeoff: more sensitivity means more false signals in choppy, low-conviction markets. The SMA’s lag, in those environments, actually filters out noise better. Knowing which to use, and when, is part of the edge.
The EMA Formula, How It’s Actually Calculated
Step 1, Choose your period (N)
Common EMA periods and their use cases:
- 9 EMA, Very short-term, used by scalpers and momentum traders
- 21 EMA, Short-term trend, popular for day trading pullbacks
- 50 EMA, Medium-term trend, widely watched by swing traders
- 200 EMA, Long-term trend, the most-watched level by institutions
Step 2, Calculate the Multiplier (Smoothing Factor)
Multiplier = 2 ÷ (N + 1)
For a 9 EMA: 2 ÷ (9 + 1) = 0.20, today’s close gets 20% weight For a 21 EMA: 2 ÷ (21 + 1) = 0.0909, today’s close gets ~9% weight For a 200 EMA: 2 ÷ (200 + 1) = 0.00995, today’s close gets ~1% weight
This is the exponential decay in action. A 9 EMA reacts sharply to today’s price. A 200 EMA barely notices it.
Step 3, Calculate the first EMA value
The first EMA value is simply the SMA of the first N periods. This seeds the calculation.
Step 4, Apply the EMA formula going forward
EMA = (Today’s Close × Multiplier) + (Previous EMA × (1 − Multiplier))
For the 9 EMA with today’s close at $150 and yesterday’s EMA at $147:
EMA = (150 × 0.20) + (147 × 0.80) = 30 + 117.60 = $147.60
The EMA moved toward today’s close but is anchored by the prior trend. Run this calculation every bar and you get a line that follows price with precision, fast enough to be useful, smooth enough to filter random noise.
The Four EMA Levels Every Trader Watches
The 9 EMA, The Momentum Trigger
The 9 EMA is the heartbeat of intraday momentum trading. It is so close to price that in a strong trend it acts almost like a shadow, price pulls back to it, finds support, and continues. When price breaks convincingly below the 9 EMA on a momentum stock, the move is stalling.
Best use: Momentum day trading on 1-minute to 15-minute charts. Stocks like NVDA, TSLA, AMD in fast trend days.
Signal: Price holding above 9 EMA on pullbacks = trend intact. Price closing below 9 EMA = momentum failing.
The 21 EMA, The Pullback Level
The 21 EMA is the workhorse for active traders. It is far enough from price to absorb normal volatility but close enough to signal trend changes within a day or week. The best momentum stocks pull back to the 21 EMA before continuing, giving disciplined traders a clean entry with a tight stop.
Best use: Day trading on 5-minute to hourly charts. Swing trading on daily charts for 1–2 week holds.
Signal: In an uptrend, buy the first touch of the 21 EMA with a stop below. In a downtrend, short the first rejection of the 21 EMA from below.
The 50 EMA, The Trend Dividing Line
The 50 EMA separates short-term noise from medium-term trend. Swing traders and growth investors watch this level the way day traders watch VWAP, it is the institutional battleground for medium-term direction.
Best use: Daily charts for swing trades. Defining the medium-term trend on any timeframe.
Signal: Stock above 50 EMA = medium-term bullish. Stock below 50 EMA = medium-term bearish. A clean reclaim of the 50 EMA after a correction is one of the most reliable swing long setups in technical analysis.
The 200 EMA, The Long-Term Compass
The 200 EMA is the most widely referenced moving average in the world. Every institutional desk, every algorithmic system, every financial news broadcast references the 200-day moving average as the dividing line between bull and bear territory.
Best use: Daily and weekly charts for long-term trend identification.
Signal: Price above the 200 EMA = long-term uptrend. Price below = long-term downtrend. The 200 EMA acts as major support in bull markets, stocks frequently bounce from it with precision on the daily chart.
EMA Crossover Strategies
The EMA crossover is one of the oldest and most tested trading signals. When a shorter EMA crosses above a longer EMA, momentum is shifting bullish. When it crosses below, momentum is shifting bearish.
The 9/21 EMA Crossover, Day Trading Signal
Bullish cross: 9 EMA crosses above 21 EMA → short-term momentum turning up Bearish cross: 9 EMA crosses below 21 EMA → short-term momentum turning down
This is the go-to crossover for momentum day traders on the 5-minute and 15-minute chart. It is fast, sensitive, and works best on high-volume trending days. On choppy, low-volume days it generates false signals, always filter with volume and broader market context.
The 50/200 EMA Crossover, The Golden and Death Cross
The Golden Cross: 50 EMA crosses above the 200 EMA → long-term bullish signal The Death Cross: 50 EMA crosses below the 200 EMA → long-term bearish signal
These crossovers are slow, they occur only a handful of times per year, but they carry significant weight because every institutional system in the world monitors them. When SPY produces a Golden Cross, it generates news coverage, algorithmic buy signals, and retail attention simultaneously. That self-fulfilling dynamic makes the signal more powerful than the math alone would suggest.
EMA as Dynamic Support and Resistance
This is the most practically useful application of EMAs for active traders, and the most underappreciated.
In a healthy uptrend, rising EMAs act as dynamic support, not horizontal levels, but moving targets that price gravitates toward on pullbacks. The strongest stocks pull back to their 9 or 21 EMA repeatedly, find buyers, and continue higher. Each successful test of the EMA reinforces the trend.
How to trade EMA support:
- Identify a stock in a clear uptrend (price above rising 21 EMA, 21 EMA above rising 50 EMA)
- Wait for a pullback to the 21 EMA
- Look for a reversal candle at the EMA, hammer, bullish engulfing, or strong close off the level
- Enter on the next candle, stop below the EMA by a buffer (0.5–1%)
- Target the prior high or a measured move extension
In a downtrend, EMAs flip to dynamic resistance. Rising EMAs become falling EMAs, and every bounce into them finds sellers. The short setup is the mirror image of the above.
A Complete Day Trading Setup Using the EMA
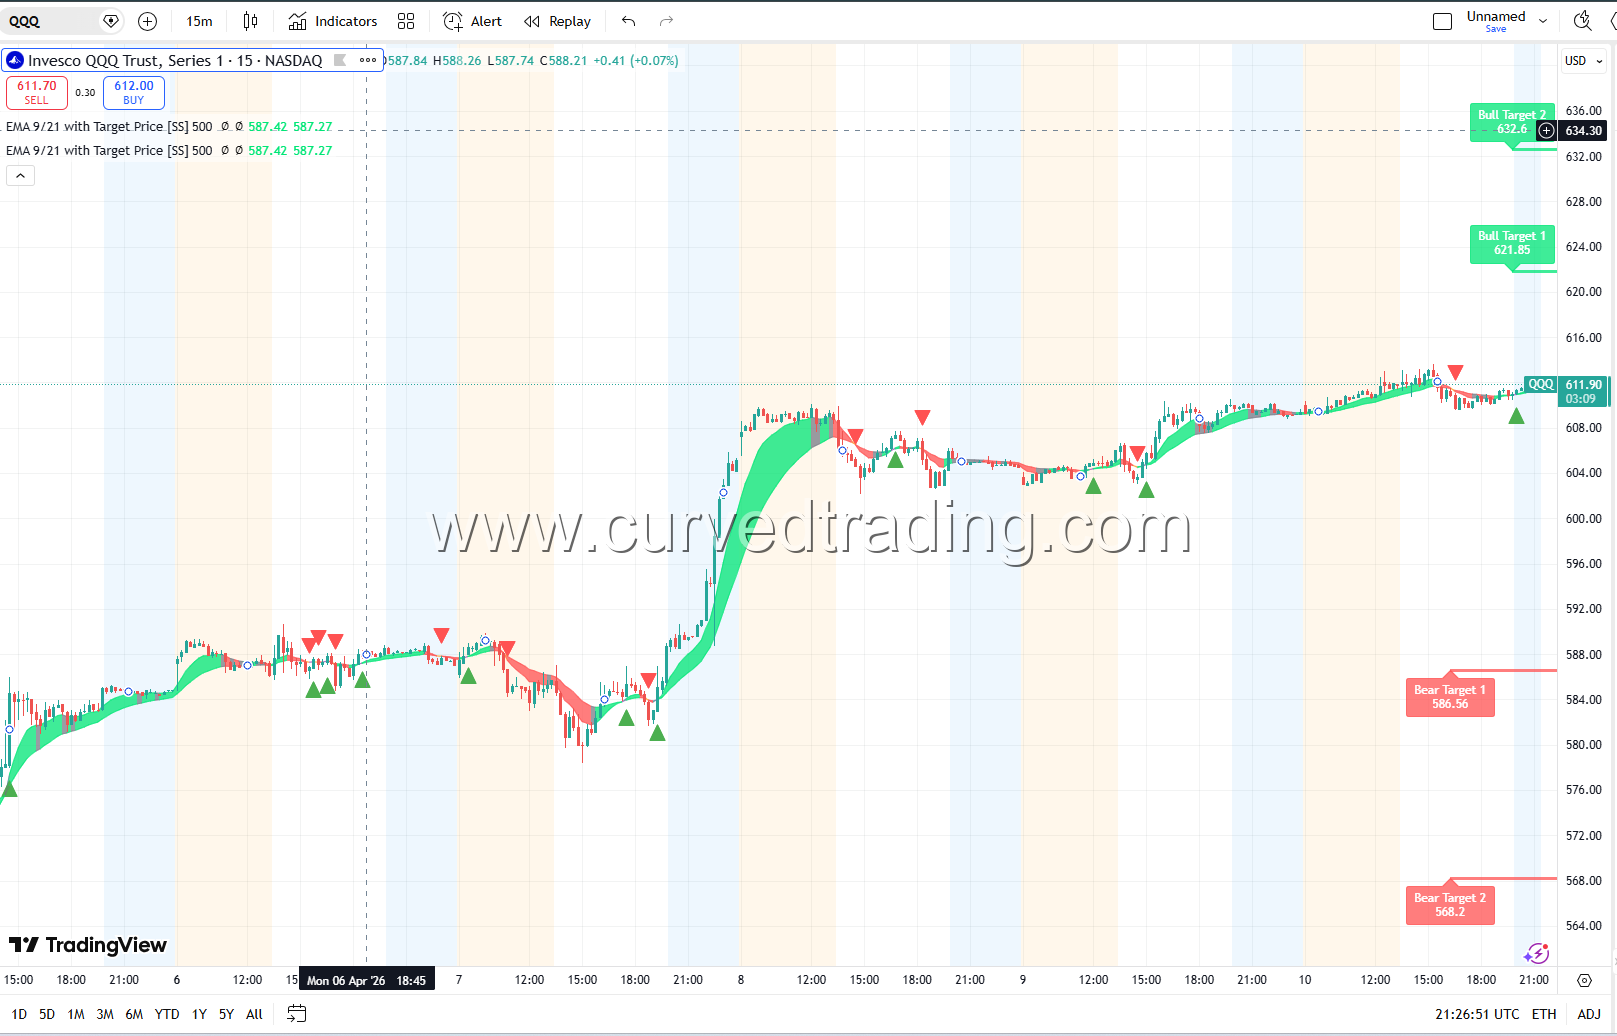
Scenario: You are watching QQQ on a 15-minute chart on a trend day.
Pre-market: QQQ gaps up. The 9 EMA is above the 21 EMA. The 21 EMA is above the 50 EMA. The EMA stack is bullish and aligned.
9:45 AM: QQQ rallies from the open, then pulls back to the 21 EMA at $447.80. A hammer candle forms. Volume on the pullback was light, sellers were not aggressive.
10:00 AM: QQQ closes back above $448.20 on the 15-minute chart, reclaiming ground above the 21 EMA. The 9 EMA begins curling back up.
Entry: Long at $448.30 Stop: $447.40 (below the hammer low and 21 EMA) Target: $451.00 (prior day high) Risk/Reward: ~1:3
What made this valid:
- Full EMA alignment (9 above 21 above 50) confirmed the trend
- Pullback was to the 21 EMA, the expected support level
- Low-volume pullback, no institutional selling
- Reversal candle confirmed buyer presence at the level
EMA Ribbon, Reading the Full Trend Structure
Advanced traders use an EMA ribbon, multiple EMAs plotted simultaneously (typically 8, 13, 21, 34, 55), to read the full trend structure at a glance.
Ribbon expanding upward (shorter EMAs above longer EMAs, all sloping up): Strong uptrend, full momentum Ribbon compressed (all EMAs bunched together): Consolidation, trend undecided, watch for expansion Ribbon inverting (shorter EMAs crossing below longer EMAs): Trend reversal in progress
The ribbon is particularly useful for identifying the strength of a trend, not just the direction. A stock where the 8 EMA is far above the 55 EMA is in a stronger uptrend than one where they are barely separated.
Common EMA Mistakes
Using the wrong EMA for the timeframe. A 200 EMA on a 1-minute chart is meaningless. A 9 EMA on a weekly chart generates too much noise. Match your EMA period to the timeframe and your holding period.
Taking every EMA cross as a signal. In choppy markets, the 9 and 21 EMA will cross dozens of times in a single session, each generating a fake signal. Filter crossovers with volume and overall trend context before trading them.
Ignoring the slope. The value of the EMA matters less than its slope. A price at the 21 EMA on a steeply rising slope is a very different setup from a price at the 21 EMA on a flat or declining slope.
Not stacking EMAs for confluence. A single EMA is a reference point. Three EMAs aligned in the same direction, 9 above 21 above 50, all rising, is a high-conviction trend signal. Always look at the full EMA structure, not just one line.
Final Thought: The EMA Is a Trend’s Heartbeat
The Exponential Moving Average is not a complex tool. Its mathematics are accessible, its logic is intuitive, and its application is immediate. What separates traders who profit from it from those who don’t is not knowledge of the formula, it is discipline in application.
Use the EMA to define your trend. Use it to identify pullback entries. Use the crossover to confirm momentum shifts. And always ask: is the slope rising or falling? Is price above or below? Is the EMA stack aligned or mixed?
A rising price above a rising EMA is one of the most powerful market conditions in trading. The EMA does not generate that condition, it simply shows you when you are in it.
That is enough.